KLARSTEIN 10030683 Delicatessa 3 Varicook Domino Virtuosa 3 Induction Hob

Dear Customer,
Congratulations on purchasing this device. Please read the following instructions carefully and follow them to prevent possible damages. We assume no liability for damage caused by disregard of the instructions and improper use. Scan the QR code to get access to the latest user manual and more product information.
TECHNICAL DATA
| Item number | 10030683, 10034193, 10034194, 10036334 |
| Power supply | 220-240 V ~ 50/60 Hz |
SAFETY INSTRUCTIONS
- The installation and connection of the new appliance must only be carried out by qualified personal.
- Repairs to the appliance are only to be carried out by approved service persons. Repairs carried out by inexperienced persons may cause injury or serious malfunctioning. If your appliance needs repairing, please contact costumer service.
- If your appliance malfunctions or fractures: switch off all cooking zones, and contact costumer service. If the surface is cracked, switch off the appliance to avoid the possibility of electric shock. Do not re-use your hob until the glass surface has been changed. If the supply cord is damaged, it must be replaced by its service agent or similarly qualified persons in order to avoid a hazard.
- This device may be only used by children 8 years old or older and persons with limited physical, sensory and mental capabilities and / or lack of experience and knowledge, provided that they have been instructed in use of the device by a supervisor responsible for them and understand the associated risks. Ensure that children do not play with the device.
- Accessible parts may become hot during use. Young children should be kept away.
- The cooking zones will become hot when you cook. Therefore, always keep small children away from the appliance.
- Although cooktop is equipped with a control lock, surfaces may still be hot.
Safety during Use
- This appliance may only be used for normal cooking and frying in the kitchen.
- Do not use the hob to heat the room.
- Take care when plugging in electric appliances near the hob. Connection leads must not come into contact with the hot surface.
- Overheated fats and oils catch fire quickly. You should supervise cooking when preparing foods in fat or oil.
- Switch off the cooking zones after use.
- Always keep the control panels clean and dry.
- Never place combustible items on the hob. You must not keep any combustible items aerosol cans in a drawer located under the hob.
Safety when Cleaning
- Always switch off the appliance before cleaning.
- For safety reasons do not clean the appliance with a steam jet or high-pressure cleaner.
- Clean the hob in accordance with the maintenance and cleaning instructions in this manual.
- Do not use harsh abrasive cleaners or sharp metal scrapers to clean the oven door glass since they can scratch the surface, which may result in shattering of the glass.
WIRING DIAGRAM

INSTALLATION
Cut out the work surface according to the sizes shown in the table and the drawing. For the purpose of installation and use, a minimum of 50 mm space shall be preserved around the hole. Be sure the thickness of the work surface is at least 30 mm. Please select heat-resistant work surface material to avoid larger deformation caused by the heat radiation from the hotplate.
| Dimensions (mm) | L | W | H | D | A | B | X |
| 10030683 | 288 | 520 | 52 | 48 | 265+5 | 495+5 | min. 50 |
| 10034193 |
590 |
520 |
56 |
52 |
555+5 |
495+5 |
min. 50 |
| 10034194 | |||||||
| 10036334 | 450 | 520 | 52 | 48 | 430+5 | 495+5 | min. 50 |
Installation of the foam gasket
Do not install the hob without the foam gasket. The gasket should be fitted to the hob as follows:
- Remove the protective film from the gasket.
- Then attach the gasket to the bottom of the glass next to the edge.
- The gasket must be fitted along the entire length of the edge of the glass and must not overlap at the corners.
- When fitting the gasket, ensure that the glass does not come into contact with sharp objects.

Under any circumstances, make sure the ceramic cooker hob is well ventilated and the air inlet and outlet are not blocked. Ensure the ceramic cooker hob is in good work state. As shown below.
Note: The safety distance between the hob and the cupboard above the hob should be at least 760 mm.
Before locating the fixing brackets
The unit should be placed on a stable, smooth surface (use the packaging). Do not apply force onto the controls protruding from the hob.
Easy Fit kits
There is one easy fit kits package for each hob, including fixing clips and screws (for ceramic hob total 2 clips and 2 screws, for induction hob total 4 clips and 4 screws). Find the easy fit kit package first.
Fix clips to hob:
Insert the fixing clips into fixing holes reserved on 2 sides of the housing, fix a clip to housing with screw, then insert hob into cabinet/work surface.
Fix hob to cabinet:
Insert the hob into the cabinet/work surface as shown below, the mounting clips on the sides can secure your hob sturdily.
Notes on installation
- The electric hob shall not be mounted above cooling equipment, dishwashers and rotary dryers.
- The electric hob shall be installed such that better heat radiation can be ensured to enhance its reliability. Therefore, keep to the specified distances and dimensions.
- The wall and induced heating zone near and above the work surface shall withstand heat.
- To avoid any damage, the sandwich layer and adhesive must be heat resistant.
Notes on electrical connection
- The power supply should be connected in compliance with the relevant standard, or a single-pole circuit breaker. The appliance has a large power rating and must be connected to electricity by a qualified electrician. Do not perform the installation yourself.
- If the appliance is being connected directly to the mains supply, an omnipolar circuit breaker must be installed with a minimum gap of 3 mm between the contacts.
- The installer must ensure that the correct electrical connection has been made and that it complies with safety regulations.
- The power cord must not be bent or compressed.
- The power cord must be checked regularly and only replaced by qualified technician. If the power cord or plug is damaged, it must be replaced by the manufacturer, an authorized service center, or a similarly qualified person.
DEVICE OVERVIEW AND CONTROL PANEL
Hob VariCook Domino (10030683)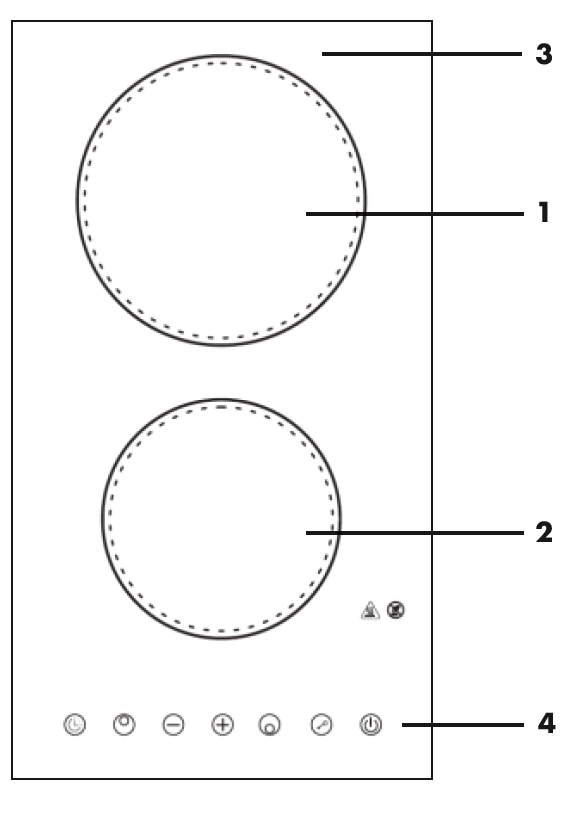
- Upper Cooking Zone 1800 W
- Lower Cooking Zone 1200 W
- Glass Plate
- Control Panel
Control Panel (10030683)
- Timer
- Upper Cooking Zone
- Heating Level/Timer (-) and (+)
- Lower Cooking Zone
- Child Lock
- ON/OFF
Hob Delicatessa 3 (10034193)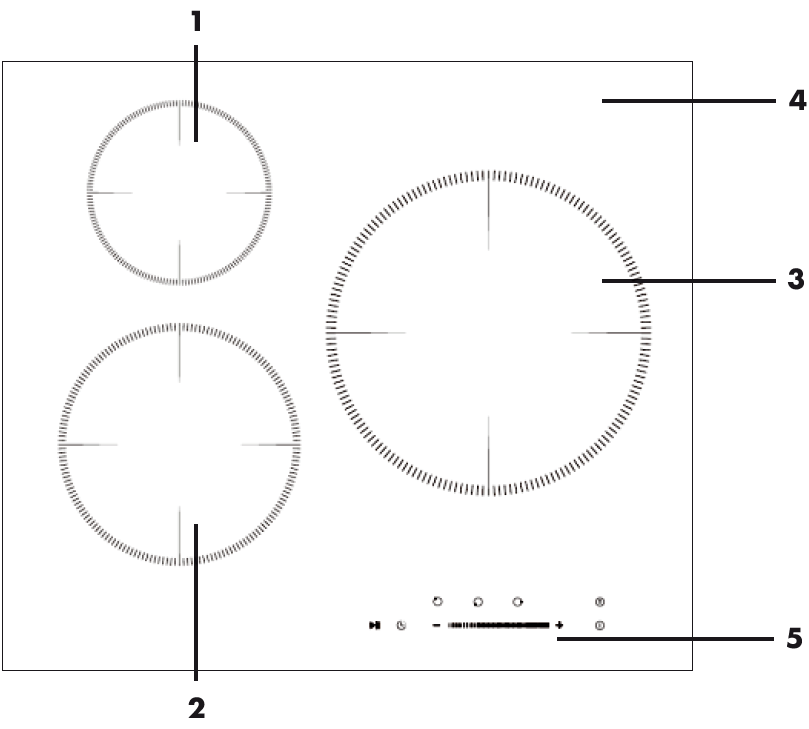
- Upper Cooking Zone 1500 W
- Lower Cooking Zone 2000 W
- Right Cooking Zone 2300 W
- Glass Plate
- Control Panel
Control Panel (10034193)
- Cooking Zone Selection
- Child Lock
- Stop & Go Function
- Timer
- Heating Level/Timer (-) and (+)
- ON/OFF
Hob Delicatessa 3 Flex (10034194)
- Upper Cooking Zone 1500 W (Boost 2000 W) 5 Control Panel
- Lower Cooking Zone 2000 W (Boost 2600 W) 6 Glas Plate
- Left flexible Cooking Zone 3000 W (Boost 3600 W)
- Right Cooking Zone 2300 W (Boost 3000 W)
Control Panel (10034194)
- Cooking Zone Selection
- Boost Function
- Stop & Go Function
- Timer
- Left flexible Cooking Zone
- Heating Level/Timer (-) and (+)
- Child Lock
- ON/OFF
Note: The details of your hob may differ slightly from the product pictures shown here. These are only for reference.
Hob Delicatessa 3 Flex (10036334)
- 1200 W cooking zone
- 1800 W cooking zone
- 2000 W/1000 W cooking zone
- Glass plate
- Control panel
Control Panel (10036334)
- Extended zone control button
- Cooking Zone selection button
- Timer control button
- Child Lock control button
- Stop & Go control button
- Heating level/Timer “-” and “+” button
- ON/OFF button
GETTING STARTED
Note: Remove any protective film that may still be on your new electric hob.
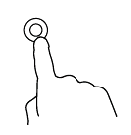
Using the Touch Controls
- The controls respond to touch, so you don’t need to apply any pressure.
- Use the ball of your finger, not its tip (see figure).
- You will hear a beep each time a touch is registered.
- Make sure the controls are always clean, dry, and that there is no object ( e.g. an utensil or a cloth) covering them. Even a thin film of water may make the controls difficult to operate.

Choosing the right Cookware
- Only use cookware with a base suitable for induction cooking. Look for the induction symbol on the packaging or on the bottom of the pan.
- You can check whether your cookware is suitable by carrying out a magnet test. Move a magnet towards the base of the pan. If it is attracted, the pan is suitable for induction hob.
- If you do not have a magnet:
- Put some water in the pan you want to check.
- If the indicator does not flash in the display and water is heating, the pan is suitable.
- Cookware made from the following materials is not suitable for an induction hob: pure stainless steel, aluminium or copper without a magnetic base, glass, wood, porcelain, ceramic, and earthenware.
- Induction hob are made from smooth, ceramic glass, the heat comes from a magnetic induction coil which heats the cookware but not the cooking surface. The heat from the cookware is transferred to the food.
- It’s important that you use only metal pans specifically designed and/or approved for use on induction hobs. Never allow melamine or plastic containers to come in contact with the heat zones.
- A pan which diameter less than 140 mm may not be detected by the induction hob.

Note: You can use any kind of pot or pan for ceramic hob.
Suggested Pan dimensions for induction hob
The cooking zones are, up to a limit, automatically adapted to the diameter of the pan. However, the bottom of this pan is suggested to have a minimum of diameter according to the corresponding cooking zone. To obtain the best efficiency of your hob, please place the pan in the centre of the cooking zone.
Suggested size of cookware (bottom diameter)
OPERATION
To start cooking
- After the hob has ben connected to electricity and power on. Touch and hold the ON/OFF button for about 3 seconds till you hear a “beep” to turn the hob on. Now the hob enters into standby mode, all heat setting indicators and timer setting indicators show “-“.
- Place a suitable pan on the cooking zone you wish to use. Make sure the bottom of the pan and the surface of the cooking zone are clean and dry.
- Touch the heating zone button to select the cooking zone you want to use. The heat setting indicator of the selected zone will flash.
- Set the heating level as follows:
Model with Touch control (figure right):
Set heat setting by touching the “+” or “-” button. If you touch and hold either of the two buttons, the value will adjust down or up rapidly, from 0 to 9 in circle.
Models with Slider Touch control (figure below): Adjust heat setting by sliding the slider control.


Notes on Use
- After you connected the appliance to electricity, when power on, the buzzer sounds briefly. All displays light up for 1 second and then go out again.
- When the hob is in standby mode, if there is no practice within 1 minute, the electric hob will auto turn off, with buzzer beeps once.
Note: To turn on the hob, touch the ON/OFF button and hold on for about 3 seconds. To turn it off, you just need to touch the ON/OFF button briefly.
- The power level can be adjusted from 0 to 9, default setting is level 5.
- The heat setting indicator of the selected zone is flashing when adjusting. After adjusting, the number is flashing for 5 seconds then stops flashing, the setting is now confirmed.
To turn off hob
- Touch the corresponding cooking zone button on the control panel and use either the ”+“ or “-“ button or the touch slider, depending on the model, to set the heat level to 0. The cooking zone is now switched off and the display shows „-“ in this case.
- You can also turn the whole hob off by touching the ON/OFF button.
Note: The cooling fan of induction hob will remain on for about 1 minute after the hob is turned off.
OTHER FUNCTIONS
Extended cooking zones (ceramic hobs)
Some of the ceramic hob models might have one or several extended cooking zones (Oval/Dual/Triple zone), these extended zones can provide larger cooking area and additional heat to fit for different size of cooking pan. To use the extended zone when the hob is working, proceed as follows:
- Select and activate the cooking zone in which you would like to use extended zones, for those cooking zone with this feature. Touch the heating zone selection button to select and activate it for adjustment.
- The central zone will be switched on, when first adjusting of heat level for the extended cooking zone.
- When the heating zone is selected and activated (the power level indicator is flashing), touch the extended zone button to activate the extended heating element to get a large heating area.
Flexible Cooking Areas (Induction Hobs)
Some of the models might have one or several flexible cooking areas. These flexible cooking areas can each be used as a single zone or as two independent zones, accordingly to the cooking needs anytime. Flexible areas are each made of two independent inductors that can be controlled separately. When working as a single zone, cookware is moved from one zone to the other one within the flexible area keeping the same power level of the zone where the cookware originally was placed, and the part that is not covered by cookware is automatically switched off.
Note: Make sure to place the cookware centered on the single cooking zone. In the case of big pots, oval, rectangular, and elongated pans make sure to place the pans centered on the cooking zone covering both crosses.
Activate the flexible induction area:
To activate a flexible area as a single big zone, first touch either of the two cooking zone selection buttons of this flexible area, then press the flexible area button. When the flexible area works, the indicator above the corresponding flexible area button will light up, the power level indicator will flash, and you can adjust power level of the flexible area by slide the slidern.
Deactivate the flexible induction area:
To deactivate the flexible area during operation, press either of the two cooking zone selection buttons of this flexible area, when power level indicator is flashing, touch the flexible button again. The indicator will turn off after the flexible area is deactivated.
Child Lock Safety Control
You can lock the controls to prevent unintended use (for example children accidentally turning the cooking zones on) by activating child lock function.
Note: When the controls are locked, except the ON/OFF button and the child lock button, all other touch control buttons are disabled.
HEAT SETTINGS
| Power level | Suitability |
|
1-2 |
• Delicate warming for small amounts of food
• Melting chocolate, butter, and foods that burn quickly • Gentle simmering • Slow warming |
|
3-4 |
• Reheating
• Rapid simmering • Cooking rice |
| 5-6 | • Pancakes |
|
7-8 |
• Sautéing
• Cooking pasta |
|
9 |
• Stir-frying
• Searing • Bringing soup to the boil • Boiling water |
Note: The settings below are guidelines only. The exact setting will depend on factors including your cookware and the amount you are cooking. Experiment with the hob to fi nd the settings that best suit you.
CLEANING AND CARE
CAUTION
Risk of electric shock and injury! Before any maintenance or cleaning work is carried out, disconnect the appliance from electricity supply and ensure the appliance is completely cool.
Cleaning the Hob Surface
- Clean spillages from the hob surface as soon as possible after use. Clean spillages from the hob surface as soon as possible after each use with a soft cloth or kitchen paper. Always ensure the surface is cool enough before cleaning. If soiling has dried up, you may want to use a specialist vitro-ceramic glass cleaner, which is available in most supermarkets.
- Do not clean the appliance with a high-pressure cleaner.
- Do not use other abrasive cleaners and/or wire wool ect., as it may scratch the ceramic glass surface of your hob.
Cleaning tips
| What? | How? | Important! |
| Everyday soiling is on the glass (fingerprints, marks, stains
left by food or non-sugary spillovers on the glass). |
1. Switch off the power
supply. 2. Apply a vitro-ceramic glass cleaner while the glass is still warm (but not hot!) 3. Rinse and wipe dry with a clean cloth or paper towel. 4. Switch on the power supply to the hob. |
• When turn off the power supply of hob, there will be no ‘hot surface’ indication but the cooking zone may still be hot! Take extreme care!
• Heavy-duty scourers, some nylon scourers and harsh/abrasive cleaning agents may scratch the glass. Always read the label to check if your cleaner or scourer is suitable. • Never leave cleaning residue on the hob glass surface: the glass may become stained |
| Boil over, melts, and hot sugary spills are on the glass. | Remove these immediately with a fish slice, palette knife or razor blade scraper suitable for ceramic glass of hob, but beware of hot cooking zone surfaces:
1. Switch off the power supply. 2. Hold the blade or utensil at a 30° angle and scrape the soiling or spill to a cool area of the hob. 3. Clean the soiling or spill up with a dish cloth or paper towel. 4. Follow steps 2 to 4 for “Everyday soiling on glass” above. |
• Remove stains left by melts and sugary food or spillovers as soon as possible. If left to cool on the glass, they may be
difficult to remove or even permanently damage the glass surface. • Attention: Risk of injury due to cuts ! When the safety cover is retracted, the blade in a scraper is razor-sharp. Use with extreme care and always store safely and out of reach of children. |
| What? | How? | Important! |
| Spillovers on the touch controls. | 1. Switch off the power
supply. 2. Soak up the spill. 3. Wipe the touch control area with a clean damp sponge or cloth. 4. Wipe the area completely dry with a paper towel. 5. Switch on the power supply to the hob. |
• The hob may beep and turn itself off, and the touch controls may not function while there is liquid on them. Make sure you wipe the touch control area dry before turning the hob back on. |
TROUBLESHOOTING
| Problem | Possible Cause | Possible Solution |
| The hob is not working. | There is no power to the appliance. | There may be a power failure. If not, make sure the hob is plugged in and turned on.
Check whether a fuse is turned on or broken. If the problem persists, contact a qualified technician. |
| The timer has elapsed. | The set cooking time has been reached and the appliance has switched off automatically. | |
| There is overflowing liquid on the control panel. The automatic overflow protection ensures that the hob switches off. | Clean the control panel (see
section “Cleaning and care”). |
| Problem | Possible Cause | Possible Solution | |
| The function | The buttons are locked because | Deactivate the child lock (see | |
| buttons do not | the child lock is activated. “Lo” | “Deactivate the child lock” in | |
| react or are | appears in the timer display. | the “Other Functions” section). | |
| very difficult to
operate. |
|||
| A thin film of water or a wet
cloth is on the control panel |
Check if the buttons are dry and wipe them dry if necessary. | ||
| and the automatic overflow | |||
| protection has been activated. | |||
| You are using the fingertips | Use the ball of your finger. | ||
| instead of the ball of your | |||
| finger. | |||
| After cooking | The automatic safety function | That is normal. The hob is | |
| there is “H” | residual heat warning has been | equipped with safety functions | |
| shown on | activated. | to warn against residual heat. | |
| display. | It remains on until the surface is | ||
| cool enough to touch. | |||
| After switching | The induction hob is completely | That is normal. The “run-on” | |
| off, the fan of | cooled down by the continued | of the fan is not a fault, but the | |
| the induction | operation of the fan. | necessary cooling function of | |
| hob remains | the hob. | ||
| working for a | |||
| while. | |||
| Some pans | These noises are caused by the | This is not an error, such noises | |
| make crackling | induction coils during cooking. | are normal. | |
| or clicking | Due to their construction, | ||
| noises. | such noises can also occur | ||
| with certain cooking utensils, | |||
| as the bases are often made | |||
| of different materials which | |||
| expand differently when | |||
| heated. |
| Problem | Possible Cause | Possible Solution |
| The glass is being scratched. | Rough-edged cookware, unsuitable, abrasive scourer or cleaning products are used. | Use cookware with flat and smooth bases. See „Choosing the right cookware“ in section
„Getting Started“. |
Failure Inspection for induction hob
- If an abnormality comes up, the induction hob will enter the protective state automatically and display corresponding protective codes, which are listed in the following table.
Problem Possible causes Possible Solution E1/E2 Abnormal supply voltage Check that the power supply is intact, that the hob is properly connected to the power supply, and that it is turned on. E3 High temperature of the pan sensor Check that there is no liquid in the pot or pan on the hob. Fill with liquid and then restart the hob. E5 High temperature of the IGBT temperature sensor Please restart the induction hob after cooling down.
Note: For all other error codes not listed in the table, turn off the hob and contact customer service.
DISPOSAL CONSIDERATIONS
If there is a legal regulation for the disposal of electrical and electronic devices in your country, this symbol on the product or on the packaging indicates that this product must not be disposed of with household waste. Instead, it must be taken to a collection point for the recycling of electrical and electronic equipment. By disposing of it in accordance with the rules, you are protecting the environment and the health of your fellow human beings from negative consequences. For information about the recycling and disposal of this product, please contact your local authority or your household waste disposal service.
MANUFACTURER & IMPORTER (UK)
Manufacturer:
Chal-Tec GmbH, Wallstrasse 16, 10179 Berlin, Germany.
Importer for Great Britain:
Chal-Tec UK limited Unit 6 Riverside Business Centre Brighton Road Shoreham-by-Sea BN43 6RE United Kingdom